任务目标
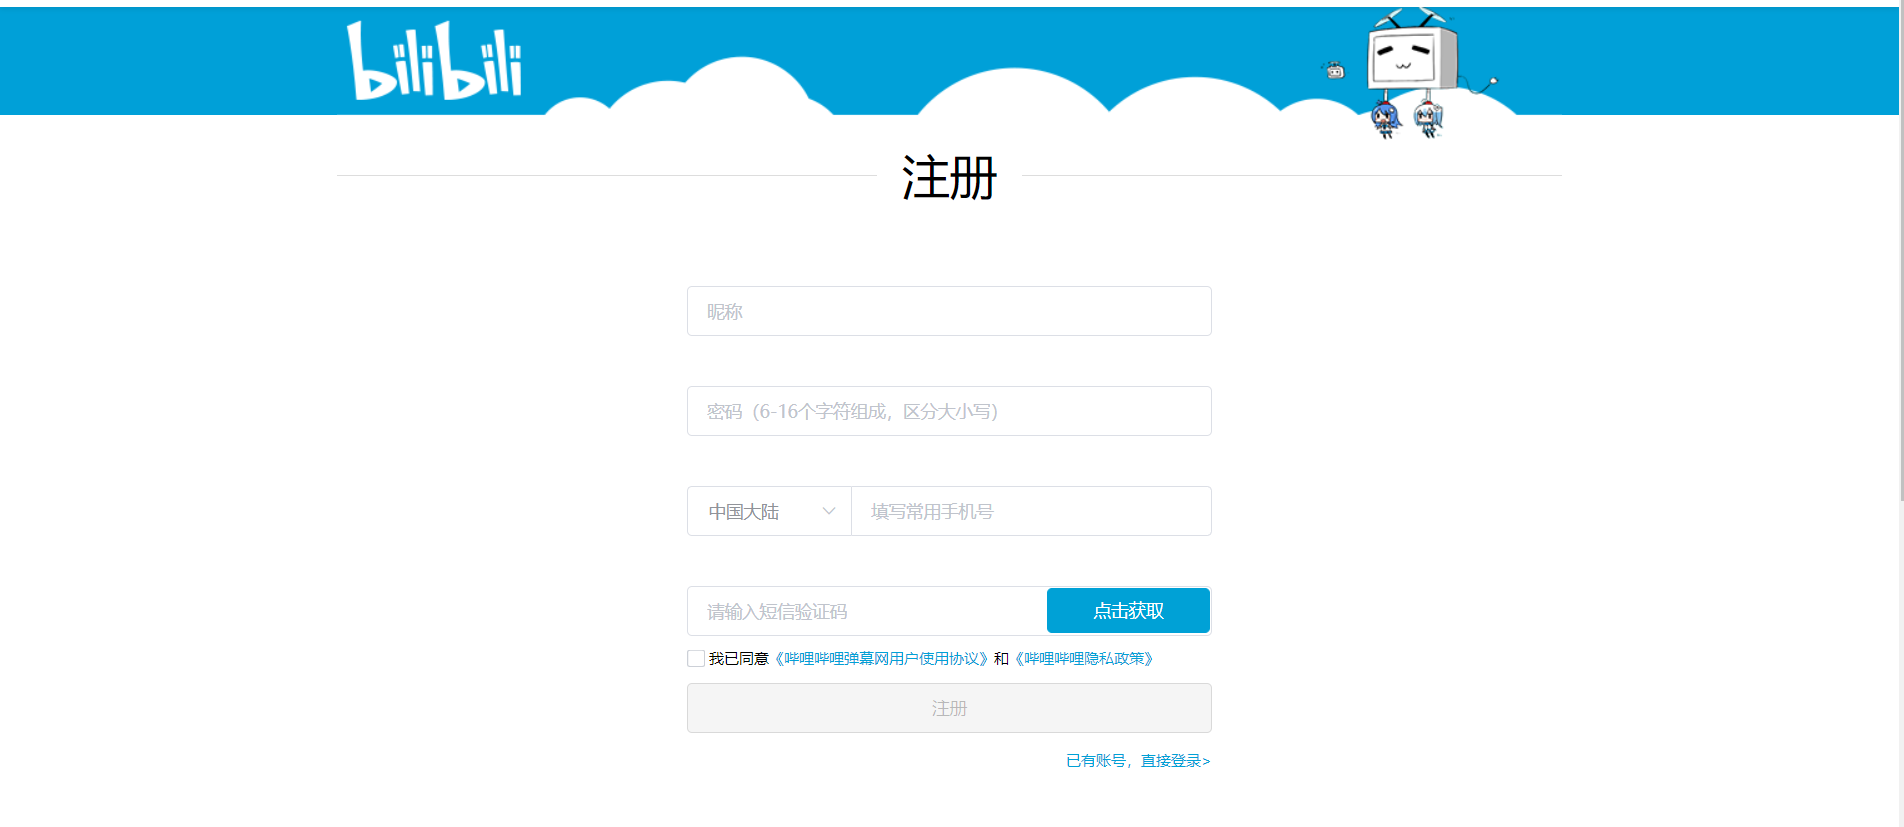
最上面的图片就不加了。
html整体规划
整体
整个区域用一个<div>括起来,类名为form,表示是一个表单。
其中由于宽度不同,“注册”下面的表单填入区域另命类名为form-area,以方便CSS修整,其中的每一项都命类名为form-item。
<div class="form">

    <h2>
        <span>注册</span>
    </h2>

    <div class="form-area">

        <div class="form-item">
            ……
        </div>

        ……

        <div class="form-item">
            ……
        </div>

    </div>

</div>
整体思路就是这样,细节之后再一点点修正补充。
“注册”标题

关键是“注册”二字两边的两条线,查看哔哩哔哩注册页的源码发现,它的实现方式是用一个下边框穿过“注册”,然后“注册”的背景颜色设为白色,盖过去。
所以我们借鉴之,的html代码设为:
<h2>
    <span>注册</span>
</h2>然后用CSS给<h2>加上下边框,给<span>加上白色背景:
.form h2{
    text-align: center;
    font-size: 38px;
    border-bottom: 1px solid #ddd;
    height: 28px;
    margin-bottom: 50px;
}
.form h2 span{
    background: #fff;
    padding: 0 20px;
}
效果图就不放了,和哔哩哔哩的一模一样。
所有文本输入框
昵称、密码、手机号、验证码这几个文本框的样式都是一样的,所以统一设置。
没什么难的,看见什么效果就写什么效果,一点点写就行。
/* 统一的文本框样式 */
input[type="text"], input[type="password"]{
    border: 1px solid #dcdfe6;
    width: 100%;
    box-sizing: border-box;
    border-radius: 4px;
    height: 40px;
    text-indent: 1em;
    font-size: 14px;
    color: #606266;
    font-family: "PingFang SC,Hiragino Sans GB,Microsoft YaHei,sans-serif";
}
input[type="text"]:hover, input[type="password"]:hover{
    border-color: #c0c4cc;
}
input[type="text"]::placeholder, input[type="password"]::placeholder{
    color: #ccc;
}
input[type="text"]:focus, input[type="password"]:focus{
    border-color: #00a1d6;
}
效果:
昵称和密码输入框
昵称输入框
看上去就是一个文本输入框:
实际上有一堆幺蛾子:


这些错误提示信息可以用CSS的绝对定位实现:
<!-- 昵称 -->
<div class="form-item">
    <input type="text" placeholder="昵称">
    <div class="error">
        该昵称已被他人占用
    </div>
</div>
.form-area .form-item{
position: relative;
}
.form-area .form-item .error{
position: absolute;
width: 240px;
right: -260px;
top: 10px;
color: #f45d90;
font-size: 12px;
}密码输入框
和昵称输入框一样,密码输入框也有错误提示信息:
处理方式CSS代码和昵称一样,就不做了。
<!-- 密码 -->
<div class="form-item">
    <input type="password" placeholder="密码(6-16个字符组成,区分大小写)">
</div>
地区选择框 + 手机号输入框

首先想到为了让它们并为一排,同时设为左浮动,处理高度坍塌。
地区选择框
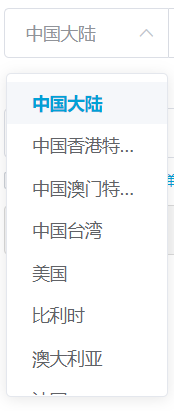
看上去是一个下拉列表,但是实际上是自制的下拉列表。
而且这部分的窗口弹出效果需要js实现,目前我们还做不到,所以只做出样式来供后端调用。
地区选择框用<div>,下拉列表用<ul>、<li>。
<!-- 地区 -->
<div class="select-item">
    <div class="title">
        中国大陆
    </div>
    <ul>
        <li>Lorem.</li>
        ...
        <li>Pariatur.</li>
    </ul>
</div>
地区选择框的CSS样式:
.form-area .select .select-item{
    width: 130px;
    border: 1px solid #dcdfe6;
    box-sizing: border-box;
}
.form-area .select .select-item .title{
    height: 40px;
    line-height: 40px;
    padding: 0 20px;
    color: #909399;
}
地区选择下拉菜单样式
地区选择下拉菜单设置一个max-height,当内容够多的时候限制最大高度为256px,内容不够时就按内容高度撑满。
另外由于<ul>的内容相当于.select-item中溢出的部分,所以即使给<ul>设置background也会出现这样的情况: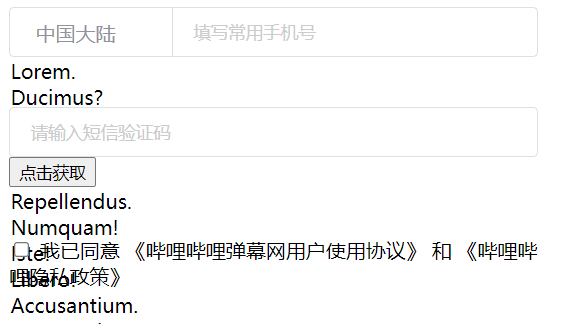
也就是它的背景无法遮挡其后的内容。
所以需要将其设为绝对定位absolute,调整其z-index:
.form-area .select .select-item ul{
    /* 最大高度 */
    max-height: 256px;
    background: #fff;
    position: absolute;
    z-index: 1;
}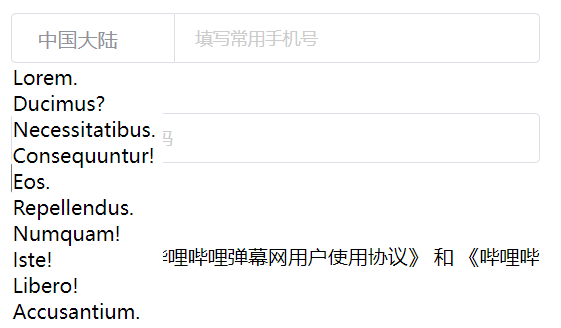
这样就可以遮挡了。
接着设置一下定位:
.form-area .select .select-item{
    position: relative;
}
.form-area .select .select-item ul{
    position: absolute;
    left: 0;
    top: 50px;
}
继续设置溢出滚动条:
.form-area .select .select-item ul{
    overflow-y: auto;
    overflow-x: hidden;
}
滚动条的样式修改以后再学。
然后是处理<li>的样式:
.form-area .select .select-item ul li{
    height: 34px;
    line-height: 34px;
    padding: 0 20px;
    cursor: pointer;
}
.form-area .select .select-item ul li.selected{
    color: #00a1d6;
    font-weight: bold;
}

.form-area .select .select-item ul li:hover{
    background: #f5f7fa;
}
效果: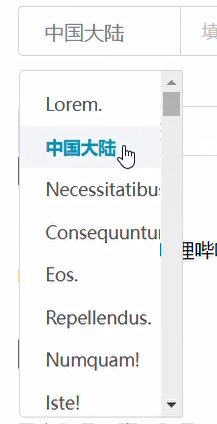
然后把它隐藏起来,至于点击时才显示的效果,那就是js的事情了。
.form-area .select .select-item ul{
    display: none;
}
手机号输入框html
<!-- 手机号 -->
<div class="input">
    <input type="text" placeholder="填写常用手机号">
</div>
两边框重合部分的圆角处理
注意这里地区选择和手机号填写直接接合的地方,并不是圆角边框,而且不应出现边框重叠:
所以直接写border-radius: 4px是不对的,会变成这样:
事实上border-radius是一个速写属性: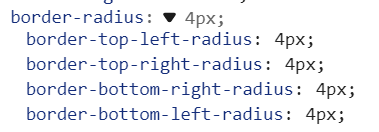
所以可以:
.form-area .select .select-item{
    border-radius: 4px;
    border-right: none;
    border-top-right-radius: 0;
    border-bottom-right-radius: 0;
}
手机号输入框也同理,设置左上和左下就行了。
.form-area .select .input input{
    border-radius: 4px;
    border-top-left-radius: 0;
    border-bottom-left-radius: 0;
}
最后得到:
短信验证码

<!-- 短信验证码 -->
<div class="form-item">
    <input type="text" placeholder="请输入短信验证码">
    <button type="button" class="btn-sncode">点击获取</button>
</div>
其实“注册”按钮和短信验证码的“点击获取”按钮样式是一样的:
所以我们统一设置整体按钮样式,局部的样式之后再微调:
button{
    height: 40px;
    background: #00a1d6;
    color: #fff;
    cursor: pointer;
    border-radius: 4px;
    border: none;
    font-size: 14px;
}
button:hover{
    background: #33b4de;
}
“点击获取”按钮微调:
.form-area .form-item{
    position: relative;
}
.form-area .form-item .btn-sncode{
    width: 130px;
    height: 36px;
    position: absolute;
    right: 2px;
    top: 2px;
}
效果:
同意协议

<!-- 同意协议 -->
<div class="readme">
    <label>
        <input type="checkbox">
        <span class="checkbos"></span>
        <span>
            我已同意
            <a href="">《哔哩哔哩弹幕网用户使用协议》</a>
            和
            <a href="">《哔哩哔哩隐私政策》</a>
        </span>
    </label>
</div>
协议链接颜色
其实网页中所有协议链接的颜色都是一样的,所以统一设置:
.form a{
    color: #00a1d6;
}
上下边距
首先处理上下边距的问题,很明显“同意协议”元素上下边距应该设为负数。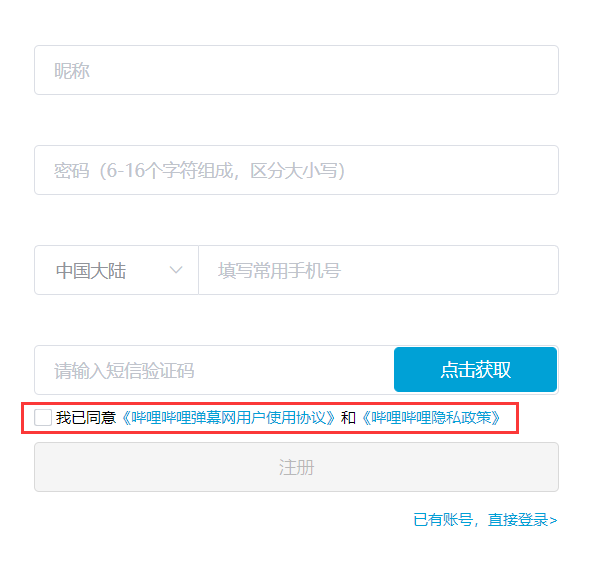
.form-area .readme{
    margin-top: -40px;
    margin-bottom: -40px;
}
多选框

哔哩哔哩的这个多选框其实是个图片: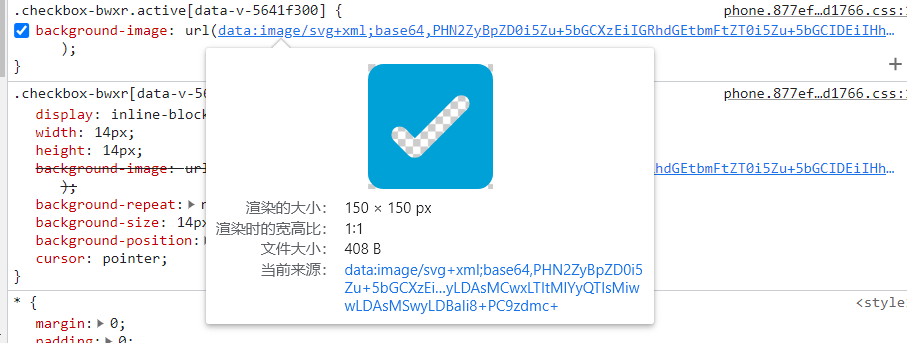
这个在CSS进阶部分再学。现在就模仿着用之前学过的自制多选框的知识大致做一下:
.form-area .readme input{
    display: none;
}
.form-area .readme input:checked+.checkbox::after{
    content: "";
    display: block;
    width: 8px;
    height: 8px;
    border-radius: 2px;
    box-sizing: border-box;
    background: #00a1d6;
    margin-left: 3px;
    margin-top: 3px;
}
.form-area .readme input:checked+.checkbox{
    border-color: #00a1d6;
}
.form-area .readme .checkbox{
    display: inline-block;
    width: 14px;
    height: 14px;
    border: 1px solid #dcdfe6;
    border-radius: 4px;
}
效果:
“注册”按钮

按钮的样式之前已经通过验证码的“点击获取”统一设置过了,所以这里宽度撑满就行了(所以取了个类名叫fill):
<!-- 注册按钮 -->
<div class="form-item">
    <button disabled class="fill">注册</button>
</div>button.fill{
width: 100%;
}另外,注册按钮是否能使用由后端决定,所以不能使用的状态也应该做出来:
button:disabled{
background: #f5f5f5;
color: rgb(0,0,0,.25);
border: 1px solid #d9d9d9;
box-sizing: border-box;
cursor: not-allowed;
}“已有账号”提示文字

<!-- 提示 -->
<div class="readme txtright">
<a href="">已有账号,直接登录></a>
</div>样式上利用同意协议.readme的样式就行了。只需再加个靠右:
.textright{
text-align: right;
}以后遇到别的需要靠右的文字也可以利用.txtright这个类名。
大功告成
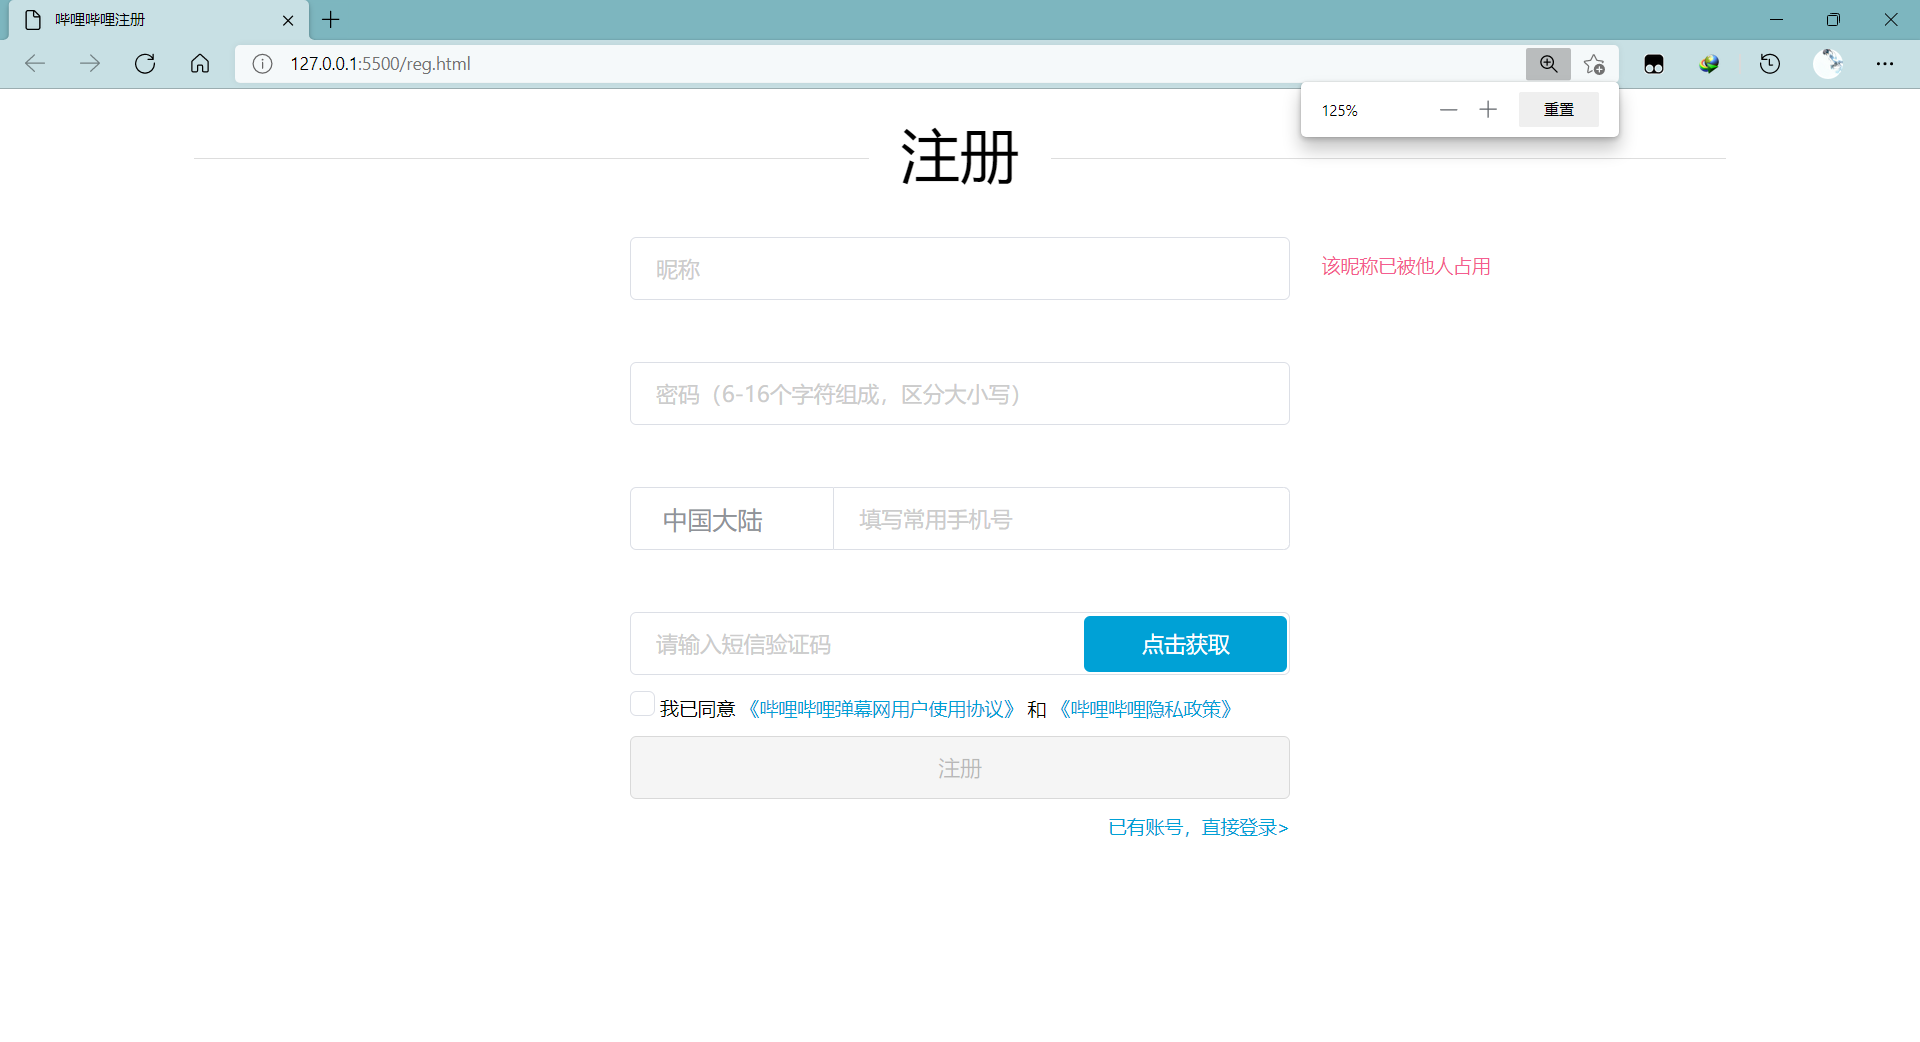
完整代码
html:
<div class="form">
<h2>
<span>注册</span>
</h2>
<div class="form-area">
<!-- 昵称 -->
<div class="form-item">
<input type="text" placeholder="昵称">
<div class="error">
该昵称已被他人占用
</div>
</div>
<!-- 密码 -->
<div class="form-item">
<input type="password" placeholder="密码(6-16个字符组成,区分大小写)">
</div>
<!-- 地区 + 手机号 -->
<div class="form-item">
<div class="select clearfix">
<!-- 地区 -->
<div class="select-item">
<div class="title">
中国大陆
</div>
<ul>
<li>Lorem.</li>
<li class="selected">中国大陆</li>
<li>Necessitatibus.</li>
...
<li>Adipisci?</li>
</ul>
</div>
<!-- 手机号 -->
<div class="input">
<input type="text" placeholder="填写常用手机号">
</div>
</div>
</div>
<!-- 短信验证码 -->
<div class="form-item">
<input type="text" placeholder="请输入短信验证码">
<button type="button" class="btn-sncode">点击获取</button>
</div>
<!-- 同意协议 -->
<div class="readme">
<label>
<input type="checkbox">
<span class="checkbox"></span>
<span>
我已同意
<a href="">《哔哩哔哩弹幕网用户使用协议》</a>
和
<a href="">《哔哩哔哩隐私政策》</a>
</span>
</label>
</div>
<!-- 注册按钮 -->
<div class="form-item">
<button disabled class=" fill">注册</button>
</div>
<!-- 提示 -->
<div class="readme txtright">
<a href="">已有账号,直接登录></a>
</div>
</div>
</div>
css:
.clearfix::after{
content: "";
display: block;
clear: both;
}
.form{
width: 980px;
margin: 1em auto;
}
.form a{
color: #00a1d6;
}
.form h2{
text-align: center;
font-size: 38px;
border-bottom: 1px solid #ddd;
height: 28px;
margin-bottom: 50px;
}
.form h2 span{
background: #fff;
padding: 0 20px;
}
/* 表单区域 */
.form-area{
width: 423px;
margin: 0 auto;
}
.form-area .form-item{
margin: 40px 0;
position: relative;
}
.form-area .form-item .error{
position: absolute;
width: 240px;
right: -260px;
top: 10px;
color: #f45d90;
font-size: 12px;
}
/* 统一的文本框样式 */
input[type="text"], input[type="password"]{
border: 1px solid #dcdfe6;
width: 100%;
box-sizing: border-box;
border-radius: 4px;
height: 40px;
text-indent: 1em;
font-size: 14px;
color: #606266;
font-family: "PingFang SC,Hiragino Sans GB,Microsoft YaHei,sans-serif";
}
input[type="text"]:hover, input[type="password"]:hover{
border-color: #c0c4cc;
}
input[type="text"]::placeholder, input[type="password"]::placeholder{
color: #ccc;
}
input[type="text"]:focus, input[type="password"]:focus{
border-color: #00a1d6;
}
/* 地区选择框 */
.form-area .select .select-item{
width: 130px;
border: 1px solid #dcdfe6;
border-radius: 4px;
border-right: none;
border-top-right-radius: 0;
border-bottom-right-radius: 0;
box-sizing: border-box;
position: relative;
}
.form-area .select .select-item .title{
height: 40px;
line-height: 40px;
padding: 0 20px;
color: #909399;
}
.form-area .select .select-item ul{
/* 最大高度 */
display: none;
max-height: 256px;
background: #fff;
color: #606266;
position: absolute;
width: 100%;
z-index: 1;
left: 0;
top: 50px;
border: 1px solid #dcdfe6;
border-radius: 4px;
border-top-right-radius: 0;
border-bottom-right-radius: 0;
padding: 10px 0;
font-size: 14px;
overflow-y: auto;
overflow-x: hidden;
}
/* 地区选择框的<li> */
.form-area .select .select-item ul li{
height: 34px;
line-height: 34px;
padding: 0 20px;
cursor: pointer;
}
.form-area .select .select-item ul li.selected{
color: #00a1d6;
font-weight: bold;
}
.form-area .select .select-item ul li:hover{
background: #f5f7fa;
}
.form-area .select .select-item, .form-area .select .input{
float: left;
height: 40px;
}
/* 手机号输入框 */
.form-area .select .input input{
border-radius: 4px;
border-top-left-radius: 0;
border-bottom-left-radius: 0;
}
.form-area .select .input{
width: 293px;
}
/* 统一设置按钮样式 */
button{
height: 40px;
background: #00a1d6;
color: #fff;
cursor: pointer;
border-radius: 4px;
border: none;
font-size: 14px;
}
button:hover{
background: #33b4de;
}
.form-area .form-item .btn-sncode{
width: 130px;
height: 36px;
position: absolute;
right: 2px;
top: 2px;
}
/* 同意协议 */
.form-area .readme{
margin-top: -30px;
margin-bottom: -30px;
font-size: 12px;
}
.form-area .readme input{
display: none;
}
.form-area .readme input:checked+.checkbox::after{
content: "";
display: block;
width: 8px;
height: 8px;
border-radius: 2px;
box-sizing: border-box;
background: #00a1d6;
margin-left: 3px;
margin-top: 3px;
}
.form-area .readme input:checked+.checkbox{
border-color: #00a1d6;
}
.form-area .readme .checkbox{
display: inline-block;
width: 14px;
height: 14px;
border: 1px solid #dcdfe6;
border-radius: 4px;
}
/* 注册按钮 */
button.fill{
    width: 100%;
}
button:disabled{
    background: #f5f5f5;
    color: rgb(0,0,0,.25);
    border: 1px solid #d9d9d9;
    box-sizing: border-box;
    cursor: not-allowed;
}
.txtright{
text-align: right;
}